Majority of the print materials is done through offset printing that is integrated with 4 color printing or four-color process printing. It has gained a following of many small businesses and entrepreneurs who are looking for high-quality prints in the most cost-effective means.
It produces photographic quality full color prints at cheaper cost per unit, compared to inkjet printing, and other printing processes.
However, as popular or common this process maybe, some people still fall into certain pit traps. Some people set certain expectations to find they have actually been asking too much.
Things to Consider with Color Management
Think about how colors work. Think how the colors you’ve worked on will actually appear on print. There is a discrepancy with what you see and what you may get. Computer screens and prints are different media. Think about these and other things that would affect your prints.
1. Color limitations
The CMYK can only but closely match itself to the closest possible colors projected on the computer screen. The color gamut of CMYK, although relatively large, is not enough to encompass the thousands of color hues there are.
2. Monitor Calibration
What we see in our computer screen is different from what will be printed out on presses and even in desk jet printers. The computer monitor has a different color profile and produces color through RGB. Prints that are printed in CMYK cannot fully capture the colors present in RGB although it can match accurately up to a certain point or degree.
3. Machine Calibration
To maintain colors or color profiles of your design, from the pre-press department’s computer to your print out, a printing companies machines and computers are calibrated. This means it will preserve the original look and colors of your design throughout.
Added to this, whatever the material you choose, be it a 100 lb. Gloss Text paper or a 14 pt. Gloss Cover stock, the presses are still calibrated to maintain consistency in the print output. The presses are configured to recognize the properties of these paper stocks to produce prints in premium condition.
4. File Conversion and Compression
Some or part of your data can get lost along the way in the process of translation. Your files for offset printing works differently from that of your desk jet printer. The latter can process your RGB files and print it out automatically. In offset printing, you need to work in CMYK mode or convert your RGB files into CMYK.
For file compression, you may risk the image quality of your file because data compression like files saved in jpeg may lose some information. In return, the image quality of the file may be affected or compromised. Avoid this problem by saving in lossless files such as .tiff or .eps.
5. Paper finishing.
Matte paper has a polished but dull surface that gives it a natural feel. Because the paper surface is different from the standard gloss and high-gloss, matter paper absorbs more light without reflecting it back.
Gloss paper, as the name indicates, has a polished smooth surface that possesses a soft gloss. The High Gloss coated stock or UV coated gives your prints a striking and reflective surface with the sheen or gloss it has. It also has the ability to make colors more vibrant unlike the two other paper stocks.
Manage and know the issues concerning color management. And let your 4 color printing companies find the best suitable conditions to bring out the richness and vibrancy of your colorful prints. Contact your printing company now and work with the experts who can capably make your prints more brilliant.
Article Source: http://www.articlesbase.com/printing-articles/4-color-printing-and-understanding-color-management-in-5-ways-279178.html
About the Author:
This writing provides information to the readers about 4 Color Printing processes and the products and services provided with the use of this printing method. To know more about Offset Printing you may visit Color Printing Wholesale
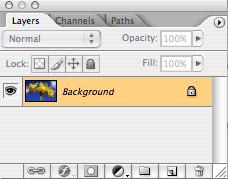
 Before we get started, you need to rename the “background” layer.
 Ok, now you’re ready to remove that background layer.
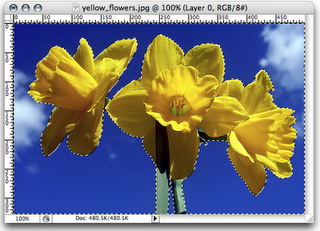
![]() tool and then start selecting the background. In our case it’s the blue sky behind the yellow flowers. Hold the shift key to select multiple areas at once.
tool and then start selecting the background. In our case it’s the blue sky behind the yellow flowers. Hold the shift key to select multiple areas at once.![]()
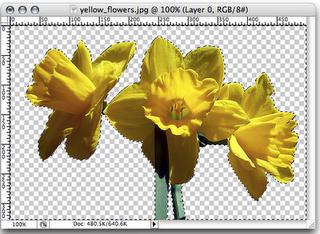
 After everything is selected, hit delete on your keyboard and your background will be removed. Notice instead of your background you see the checkerboard pattern; in Photoshop this means that the background is transparent.
 Pictures and images make a web page pop and add color and visual interest to your web page. They illustrate your products so that customers can see what they are buying, they attract and entice people to stay on your website and they provide helpful clues if you are describing a “how to” process.